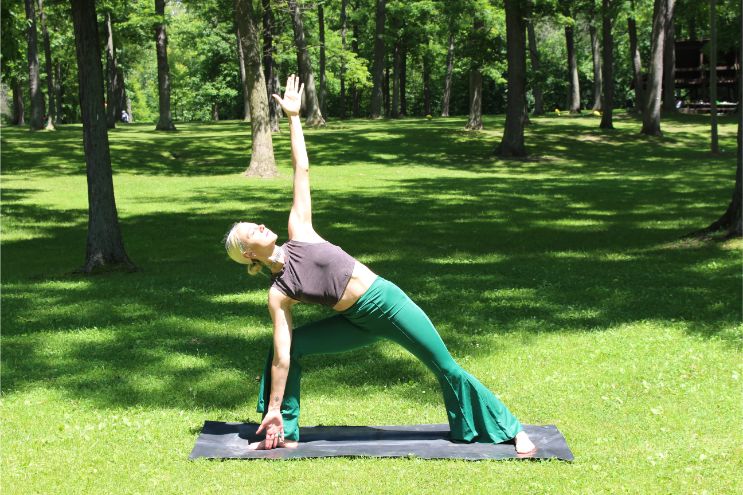
Even if you didn’t fancy maths in school, Triangle may be a yoga pose that awakens your passion for geometrical alignment. Trikonasana, as this pose is called in Sanskrit, consists of straight lines and clear angles: Your spine, your upper arm, and the front leg form a perfect triangle.
Although it’s a very basic yoga pose that is accessible for beginners and advanced practitioners, it should never be considered too basic to pay attention to the proper alignment in this asana.

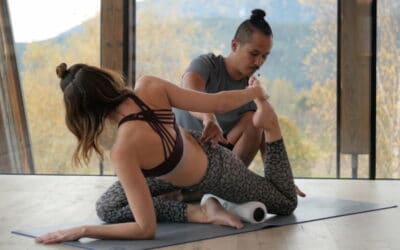
Triangle is a yoga pose that is accessible to beginners as Matt Giordano shows in Yoga for the Absolute Beginner.
So, let’s look into the Triangle yoga pose in detail:
1. How Do You Get Into Trikonasana Pose?
- One way to enter Trikonasa pose is from Extended Side Angle pose (Utthita Parsvakonasana).
- From this position, bend your knees, place both hands on the ground and arch your back.
- Once you’ve arched your back, stretch your legs again and widen your sitting bones.
- With your legs straight, pull up your pubic bone and open your chest by lifting the arm of the back-leg side. However, before you bring up your arm completely, level it parallel to the floor first. Suck your upper arm bone into your shoulder joint before you raise the arm up to the ceiling.
- Turn your head to the floor without collapsing the chest.
- Lengthen the bottom side of your body that is now facing the floor so that you have more space in your upper body.
- Push your tailbone toward your back heel. The back foot is angled in a 90 degree angle, i.e. parallel to the short edge of the yoga mat.
- At the same time, engage both thighs by pushing the front thigh toward the ground and the back thigh backward.
- Now, try again to lengthen your side body and turn your navel toward the upward-facing side of your body.
- Open your chest without collapsing into your shoulder joints.
- Bring your arms in a vertical line so that your shoulders are stacked on top of each other.
If you’re now eager to put your newly gained knowledge into practice, let Young Ho Kim guide you through the correct alignment in Trikonasana in his Inside Yoga Alignment program on TINT.
Learn how to do Trikonasana with Inside Yoga Alignment on TINT.
2. What Is Your Body Doing In Trikonasana Pose?
2.1. What Are the Joints Doing?
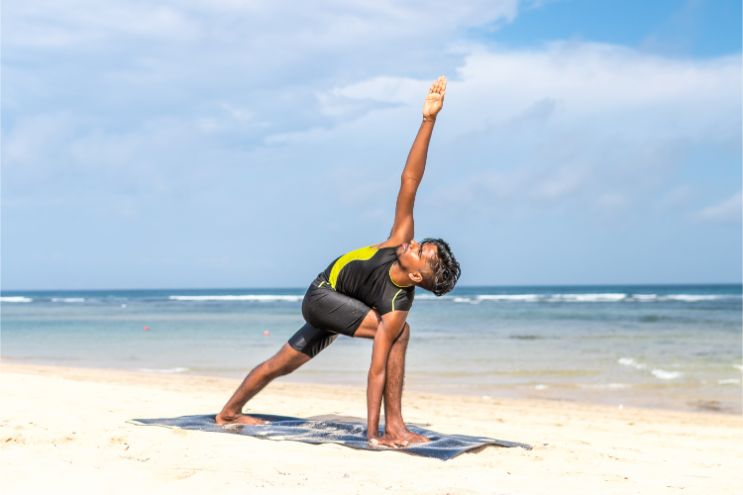
Triangle is a standing yoga pose where your spine is neutral with a slight rotation in the chest to orient to the side. The head is rotated either downward to face the ground or – as it is practiced traditionally – upward to face up to the ceiling.
In the upper limbs, the scapulae and the shoulder are abducted while the shoulder is also externally rotated. Both forearms are in a neutral position.
When it comes to the lower limbs, we have to examine the joint actions in the front leg and the back leg separately in almost all standing poses with the legs apart. This also applies to the Triangle yoga pose.
In the front leg, we see:
- nutation of the sacroiliac joint (the top of the sacrum tips forward and the bottom tilts back)
- flexion and abduction of the hip joint
- extension of the knee
- slight plantar flexion of the ankle.
Let’s now look at the back leg:
- counternutation of the sacroiliac joint (the top of the sacrum tips backward and the bottom moves forward)
- extension and adduction of the hip joint
- extension of the knee
- dorsiflexion of the ankle
- supination at the heel of the foot and pronation at the forefoot.

Practice Triangle pose with David Lurey and Mirjam Wagner’s Yin & Yang for Hips and Lower Spine on TINT.
2.2. Which Muscles Are Engaged?
Triangle is a yoga pose that works a variety of muscles in the spine. The main actors are the spinal extensors and flexors that are alternating between concentric and eccentric contraction in order to maintain the neutral alignment of the spine.
The rotation of the chest is effected by the internal oblique of the back-leg side and the external oblique of the front-leg side. The neck muscles are responsible for the rotation of the neck.
The serratus anterior effects the abduction of the scapula while the rotator cuff muscles as well as the biceps brachii and the deltoid help to stabilize and abduct the shoulder joint.
In the front leg, the gluteus medius and minimus effect the abduction of the hip while the articularis genu and vastii extend the knee.
To abduct the hip joint and prevent the hip from collapsing into gravity when it is flexed, the muscles in the pelvis, such as gluteus maximus and piriformis, are in eccentric contraction as well as the hamstrings at the hip joint.
The intrinsic and extrinsic muscles of the front foot contract eccentrically in order to maintain the integrity of the foot without collapsing.
In the back leg, the hamstrings contract concentrically at the hip joint to effect the hip extension while articularis genu and vastii again extend the knee. The gracilis muscle supports the inner knee.
The intrinsic muscles of the back foot are contracted to maintain the arch of the foot without inhibiting the dorsiflexion at the ankle.
The piriformis and other pelvic muscles contract eccentrically to maintain the extension of the hip while it is adducted. The gluteus medius and minimus are responsible for the hip abduction.
The peroneus muscles in the back foot allow the outer ankle to lengthen without collapsing the inner knee or the inner foot.
In Trikonasana pose, the weight of the upper body is mainly on the front leg. Since the front knee is extended, there is not only eccentric contraction of the quadriceps to keep the knee from bending too deeply but also a certain degree of balance around the knee joint is required to avoid hyperextending the knee.
Should you feel any pain or pressure in the front knee, this may be due to lack of mobility in the hip joints and pelvis. Any sensations in the knee (or any joint) are important signals to back out of the pose and adjust your position.
In the back-leg side, the muscles that cross the side of the pelvis, the outer hip, and the outer knee need to contract eccentrically so that the pelvis can tilt sideways over the leg. If these muscles don’t lengthen, the range of motion in the pelvis is limited and the spine side bends. However, if these muscles don’t contract at all, the weight of the upper body can collapse into gravity, putting pressure in the outer hip or ankle.
In general, the more space in the sacroiliac joints, pelvic halves, and hips, the less rotation is needed in the spine in order for the chest to face to the side. In case the adductors in front leg are tight, the pelvis may rotate more toward the floor. As a result, the spine has to counterrotate more to open the chest. This rotation of the spine can put quite a lot of stress on the legs. This is why maintaining balanced space in the joints is more important than achieving a certain range of motion the joints.
Now it’s time to put your newly gained theoretic knowledge into practice. In Desirée Rumbaugh and Adrew Rivin‘s Transformational Home Practice program on TINT, you can follow their instructions and practice Trikonasana pose right now in your living room (or wherever you’re reading this article).
Practice Trikonasa pose with Desirée Rumbaugh and Andrew Rivin on TINT.
3. How Can You Go Deeper Into Trikonasana Pose?
In traditional yoga practices, this pose is entered into from Warrior 2 (Virabhadrasana 2) by straightening the bent front leg, pushing the hip backwards and leaning the upper body forward.
However, it might be a better idea to transition into Trikonasana differently since it is also a hamstring stretch. So if you straighten your leg before you bring your trunk down, your hip joint is blocked due to a joint lock.
So, rather start from Extended Side Angle (Utthita Parsvakonasana) and bend both knees first. This is because, with bent knees, your hip joint is unlocked and, thus, more flexible. This will also make the pose more accessible for your hamstrings.
Come into Trikonasa pose from Extended Side Angle. Photograph by Katee Lue on unsplash.
Before you straighten your legs, arch your back and move your hip joint in an anterior tilt. This will make the stretch to your hamstrings more intense and deeper. Once your legs are straight, pull your pubic bone up and lengthen your side body.
Another common mistake in Trikonasana is that the shoulder joint of the upper arm is dislocated. To avoid this, bring the arm to the front and parallel to the floor first. Push your upper arm bone back into your shoulder joint and then bring it up to the ceiling. Remember you want to open your chest, not your shoulders.
Since Trikonasana is also a side bent, it’s better for your spine to turn your head to face the ground instead of facing the ceiling or your upper thumb. However, if you look upward, you will compress your neck, which is not beneficial to your alignment. So, rather look down to your yoga mat.
The next issue is your legs and feet: Imagine you want to tear the yoga mat in two halves by pushing your feet away from each other. As a result, your legs and glutes are engaged and you can go deeper into the pose.
So remember that Trikonasana is about hamstrings. When it comes to hamstrings, tilting the pelvic floor is a very important action. However, if your legs are straight when you move into the pose, your range of motion in the hip is limited.
This is why you should bend your knees first and then tilt your hip anteriorly. This will allow you to widen your sitting bones before you straighten your legs. This is way more efficient as far as your hamstrings are concerned. This is the secret of how you can go deeper into Trikonasana.

Learn proper alignment in Triangle pose with Young Ho Kim’s Inside Yoga Alignment.
If you want to learn more about proper alignment in other yoga poses as well, check out our free yoga asana ebook. It will give you a sound understanding of the proper alignment in this and other common yoga asanas so that you can use it as a reference guide throughout your yoga practice, bringing you more comfort and ease.
4. How Do You Build Triangle As Yoga Pose Into Your Practice?
If it’s not possible to comfortably touch the floor with the bottom hand or fingertips, you can always modify Trikonasana pose by placing the palm on a block for support and to keep both sides of your waist long. You can place the block either on the inside or outside of your foot depending on what feels better for you.
Another option is to bring the bottom hand higher up the leg. This will allow you to open the chest more. Note, however, that you should never rest your hand directly on your knee.
If you want to challenge yourself a little bit, you can deepen your Triangle yoga pose by aligning the front heel with the back foot arch.
Another variation is to wrap the top arm behind the back and take hold of the inner thigh of your back leg. This will allow you to open your chest toward the sky even more.
If you want to improve your balance and engage your core, take the weight out of the bottom hand and let it hover above the floor instead of resting it on the ground or the leg.
Transition into Revolved Side Angle from Triangle pose. Photograph by Artem Bali.
To build Trikonasana into a sequence, you can, for example, transition from Warrior 2 into Extended Side Angle and then into Triangle as described above. There are a lot of ways to come into the pose. However, as already explained, the safest entry is via Extended Side Angle pose.
On the other hand, the number of poses to transition into from your Triangle yoga pose is almost unlimited. Of course, it is almost predestined to move into other standing poses such as Warrior 2 (Virabhadrasana 2), High Lunge, Warrior 1 (Virabhadrasana 1) or – its sister pose – Revolved Triangle (Parivrtta Trikonasana) or a modification Revolved Side Angle (Parivṛtta Parsvakoṇasana). Other possible follow-up poses include Half Moon (Ardha Chandrasana) and Pyramid (Parsvottanasana).
You can also lift up your trunk and orient it toward the side, i.e. the long edge of the mat, and extend the arms to the side for Five-Pointed Star pose (Utthita Tadasana). From here, bow forward into a standing wide-legged forward fold (Prasarita Padottanasana)

Release into a standing wide-legged forward fold after Trikonasana pose. Photograph by Gesina Kunkel on unsplash .
Experiment with this pose and don’t be frustrated if you can’t place your palms on the ground from the beginning. It’s okay to let the hand rest on your leg or to use a prop. Every body is different and you should always adapt the pose to the alignment of your own body and not of your neighbor’s.
Since proper alignment is king in yoga, we have created a free yoga asana ebook summarizing the alignment essentials of some of the most common yoga poses to use it as a quick reference for your yoga class. Don’t miss it!
5. What Are the Benefits of Trikonasana Pose?
However subtle the actions in Triangle pose may seem, they can have great benefits for your body. The action of folding sideways into this yoga pose helps you to build strength in the muscles of your upper body since they support the weight of your spine, rib cage, and head against gravity. The vertical alignment of your arms trains the muscles around your shoulders while at the same time opening your chest to allow your lungs to fully expand.

Try Trikonasana pose in class with Alex Harfield on TINT.
Furthermore, you will eventually experience increased range of motion in your hips, which means that you distribute the weight inside the joints over a greater surface instead of stressing only a small part of the cartilage surrounding the joint.
Trikonasana is a yoga pose that does not only strengthen the thighs, knees, and ankles, but also increases the flexibility in the groins and hamstrings and improves hip joint mobility.
It also is a whole-body stretch lengthening the hips, groins, hamstrings, and calves as well as the shoulders, chest, and spine. At the same time, Trikonasana expands your chest and shoulders.
The slight rotation of the spine stimulates the abdominal organs and may thus help your digestion.
Trikonasana is a pose that energizes you, improves your balance and focus, and increases concentration.
Due to the foot alignment and the engagement of the legs, it also encourages the natural arches in the feet.
Now it’s time for you to roll out your yoga mat and experience the benefits of this yoga pose. You can try it in a well-rounded sequence in one of our programs on TINT, such as Alex Harfield’s Dips, Binds and Balances or Matt Giordano’s Essentials of Yoga. Have fun practicing!
Build a strong foundation for Trikonasana and other yoga poses.